Friday, May 31, 2013

Gift Tags - New in the Shop!


Do you remember that little design sneaky peek from earlier in the week?

Well this is one of the products that I was working on...

They're quite difficult to photograph as they're nice and bright and shiny (my photos are not really doing them justice unfortunately).


There are two different shapes to choose from, and there are twelve original CurlyPops designs in each pack.

Ready and waiting in the shop!


Thursday, May 30, 2013

Tuesday, May 28, 2013

When inspiration hits


Inspiration. Mojo. Whatever you call it.

When it hits you just have to go with it...


Still playing with designs - new things are on the way!

Sunday, May 26, 2013

Sunday Snippets


Wrongdog


Giant canvas for my upcoming painting weekend with Tinniegirl


Matchy matchy bikeriding


Homemade dumplings - yum!


New dress


Dinner at Joes Bar with Carly


Sunday morning at MarkIt - Gorgeous teatowel by Madeleine Stamer 


MarkIt Goodies - Heart Print by Madeleine Stamer, Shagpile Earrings from Gleaners Inc, Floral Earrings by Kimono Reincarnate

Sunday Snippets with Tinniegirl


Friday, May 24, 2013

Totes...


My new Society 6 Tote Bag arrived in the mail today and I'm stoked with it!


It's the perfect size for a bit of grocery shopping (I've run out of milo - disaster)!

There's free shipping until Sunday if you'd like one for yourself.

Thursday, May 23, 2013

My Creative Space...


Well, other than the Great Bedroom Drawer Makeover, I've also been working on some new fabric designs this week....

These ones will be flying (pun intended) their way to my place very soon!

I couldn't resist adding some retro style floral prints as they're my absolute favourites.


The aeroplane fabric was based on this little travel map that I blogged in December.


I thought the aeroplanes would work perfectly with the cloud fabric (which was based on my rainbow design).


I can't wait for them to arrive so I can add them to the rest of my collection!

More creative spaces

Monday, May 20, 2013

The Great Bedroom Drawer Makeover


It's literally been years since I've been able to do any DIY. I used to be addicted to it.

I was constantly dreaming up new colour schemes for the walls, and making over old pieces of furniture.


There's nothing more fun than a bit of a reno... (especially when it involves painting stripes on the wall)


And if I had a limitless budget, I'd love to pull out my current kitchen and start from scratch just like this one at my old house.


Now that I can breathe, I can get back into it again which is very exciting!

I'm starting with my old neglected bedroom chest of drawers  - taking off these old ugly drawer pulls that I put on somewhere around 1997?


I'm painting the tapered edges of the drawer fronts, and then using my own wallpaper designs to cover the flat sections.


It's been a reeeeeally long time since I've had to use a drill. The first hurdle came when the battery was dead. I waited for it to charge, and then couldn't work out why the hole wasn't drilling..... I had the silly thing in reverse!


Second hurdle - the screws at the back of the new handles are too long and I don't own a hacksaw to cut them down.

So tomorrow, I'll be taking them to be cut down and getting back into it.

I'm only working on a drawer at a time as I don't want to empty out all of my clothes at once. Fingers crossed it all should be finished by the end of the week!

Sunday, May 19, 2013

Sunday Snippets...


Snippets from my weekend....


A surprise celebration with the birthday girl and indulging in an indoor picnic...


My ode to Bacon Week 2013


Sunday morning bike ride in the sunshine. Increased my distance to 6kms!


Basketball in the park with the little nephews..


Watch out for Michael Jordan!


Kings of the Castle


Starting on this weeks creative project - making over my old bedroom chest of drawers which haven't been touched since around 1998 (I've liked orange for a reeeeeeally long time). Watch this space...

Playing Sunday Snippets with Tinniegirl. Why not play along too?

Thursday, May 16, 2013

A Boohoo.Com Challenge.... updated


A little while I ago I received an email with a very interesting proposition.

I was asked whether I'd like to take up the creative challenge of re-fashioning any item of clothing from Boohoo.com

Now, I absolutely love a creative challenge, so of course I jumped at the chance. Anything that gets me thinking outside the creative box is fun!

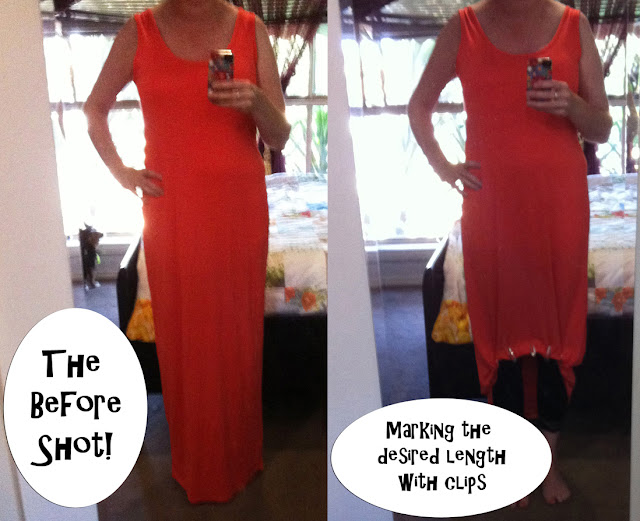
I chose this Sandy Scoop Neck Maxi Dress as there was plenty of scope for refashioning, and I know that orange suits my skin tone.

Please excuse the photo quality - it's the only full length mirror in my house

The first step to shorten the dress using my totally not-technical method.

This is how I determine the hem length on all my dresses - I just put the dress on and then clip up the hem until it's sitting at a length that I think is flattering.


I'm a little bit obsessed with Peter Pan collars since making my Alma blouse, so I decided to add one to the dress.

I simply traced the curve of the neckline of the dress and created a little paper template using graph paper.

I cut two collar templates in fabric, interfaced one of them to add structure, placed them right sides together and sewed along the bottom curved edge. I then trimmed and cut into the curved seams before turning out.


It just so happened that my Linear Design fabric in tangerine colourway matched the dress perfectly!

I placed the collar onto the top of the dress and stitched it into place, before stitching binding over the top to cover the unfinished collar seam.

I'm obsessed with pockets, so there was no way that I could forget them on this refashion!

I simply made myself another paper template in a shape that I thought would be flattering for the style of dress. They're just two pieces of fabric placed right sides together, stitched, trimmed and turned out - easy peasy.


I matched up the straight edge of the pockets with the side seams of the dress, and then simply stitched around the curved section to attach them to the dress.


The final piece of the refashioing puzzle, was to create a pretty belt to cinch in the waist (or for me, to try to create the illusion of a waist)

To create the belt, I used a method very similar to the belt in Nikki's You Sew Girl book

I love the funky red belt buckle that I had in the stash.


I used my 25mm bias tape maker to make some very simple belt loops and hand stitched these to the side seams. I can't stand it when a belt slips around up and down - belt loops are a necessity!


This is just another random photo because I LOVE the collar.


......et voila - here's the finished dress.

It turned out so much better than I'd even hoped.  Can't wait to give it a whirl!


Edited: Here's a little snapshot of what it looks like on.... I accidentally cut my head off - it's really hard to do a self-photo shoot!

Disclaimer: This is NOT a sponsored post, but I was given the dress as a gift from Boohoo.com